What is an Evil Twin Wi-Fi Attack?
An Evil Twin attack is one of the most effective Wi-Fi attacks used in penetration testing. It involves creating a fake access point that mimics a legitimate Wi-Fi network, tricking users into connecting and handing over their credentials through a captive portal.
The name "Evil Twin" comes from the fact that the rogue access point is an identical copy — a twin — of the real network, but with malicious intent.

⚠️ Disclaimer: This guide is for educational purposes only. Only perform these steps on networks you own or have explicit written permission to test. Unauthorized access is illegal and punishable by law.
How Evil Twin Attacks Work
The attack unfolds in several stages:
- Reconnaissance: The attacker identifies a target Wi-Fi network (SSID) in a public location like a coffee shop, airport, or office.
- Fake AP Creation: Using tools like Airgeddon, the attacker creates a rogue access point with the same SSID and can even replicate the MAC address of the real network.
- Deauthentication: The attacker sends deauth packets to knock users off the legitimate network, forcing them to reconnect.
- Stronger Signal: The fake AP broadcasts with a stronger signal, so devices automatically connect to it.
- Captive Portal: Once connected, users see a fake login page asking them to re-enter their Wi-Fi password.
- Credential Capture: When the victim enters their password, the attacker captures it instantly.

Why Evil Twin Attacks Are Dangerous
- Hard to detect — The fake AP uses the same SSID and can clone the MAC address
- Automated tools — Airgeddon makes it easy to execute with just a few clicks
- Public Wi-Fi is vulnerable — Coffee shops, airports, hotels, and libraries are prime targets
- Man-in-the-Middle — Once connected, the attacker can intercept ALL traffic
- No encryption needed — The captive portal trick bypasses WPA2 entirely by asking users to type the password directly
Setting Up a Practice Lab
⚠️ Warning: Only practice on networks you own. Set up an isolated lab environment.
What you need:
- Kali Linux (2024 or newer recommended) — installed on bare metal or in a VM like VirtualBox
- External USB Wireless Adapter — Must support monitor mode, packet injection, and AP mode (chipsets like MediaTek MT7612U work well)
- Test router — your own router, dedicated for testing and disconnected from the internet
- Victim device — A phone or laptop to act as the "victim"
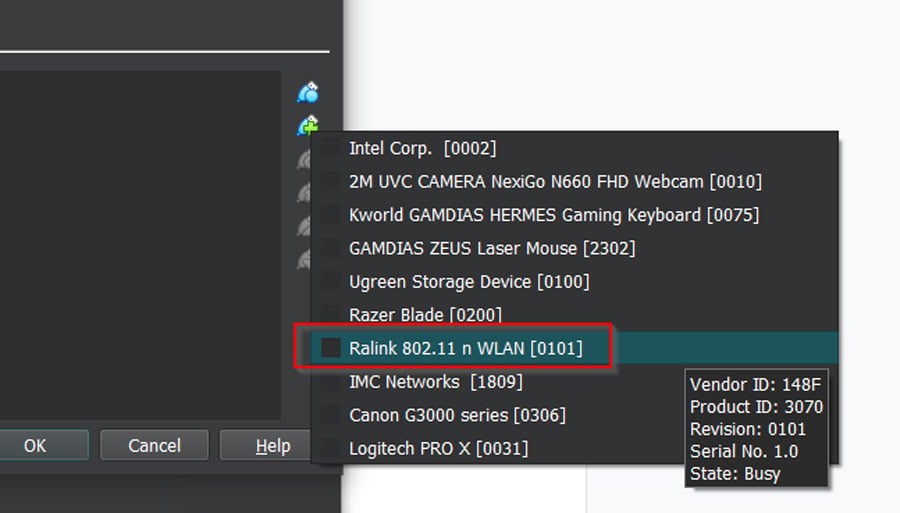
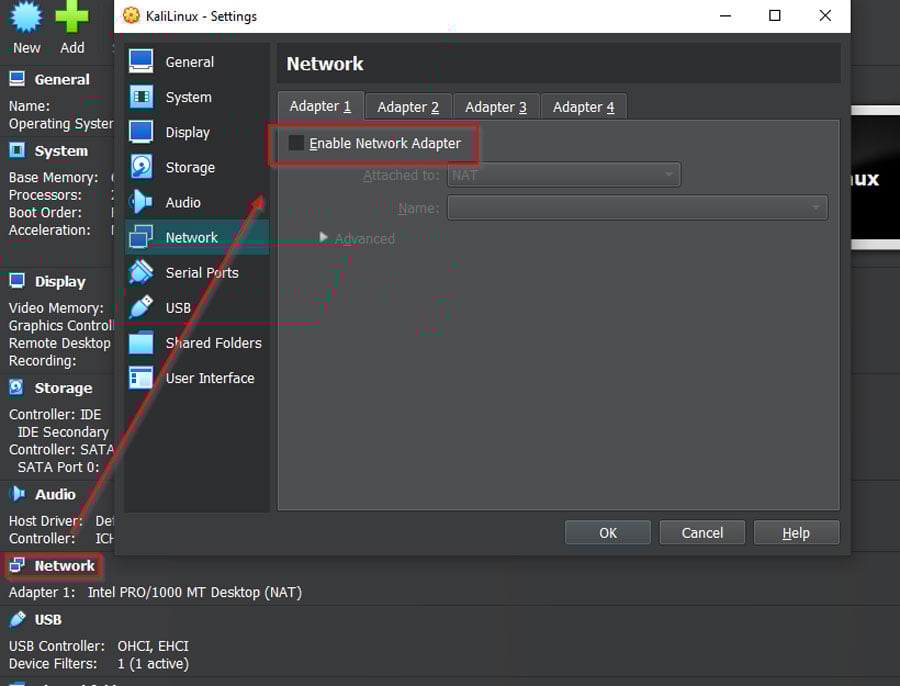
Setting up the USB adapter in VirtualBox
First, connect your USB wireless adapter and configure VirtualBox to pass it through to your Kali VM:
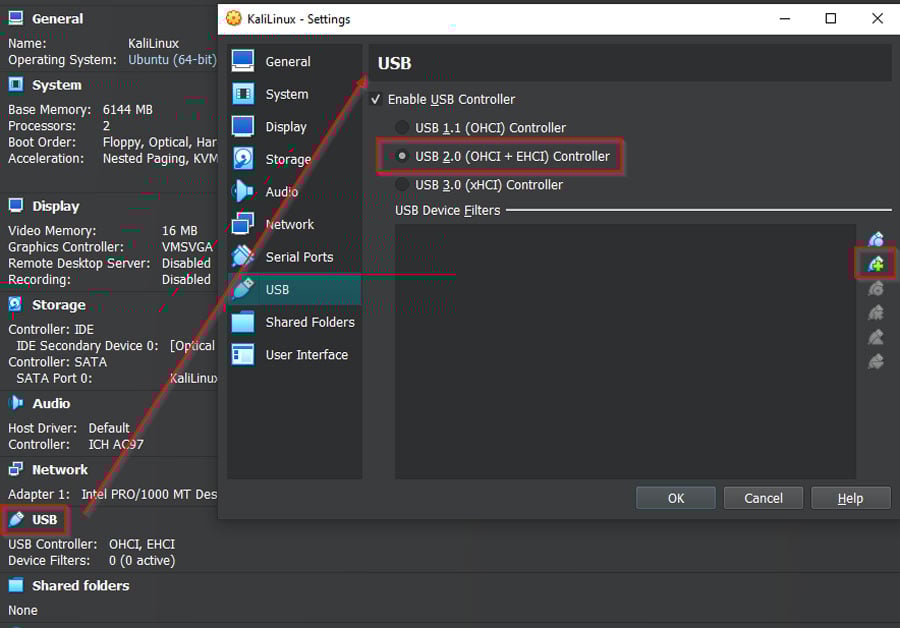
Add the network adapter in VirtualBox settings:
Make sure to uncheck "Enable Network Adapter" for the default adapter so only your USB adapter is active:
Verify the adapter details:
Step-by-Step: Evil Twin Attack with Airgeddon
Airgeddon is a powerful multi-purpose bash script for wireless network auditing that automates the entire Evil Twin attack process — including deauthentication, handshake capture, and captive portal setup. Below is a complete 13-step walkthrough covering every command and action.
Step 1 — Update Kali Linux and Install Airgeddon
First, update your system:
1sudo apt update && sudo apt upgrade -y2Install Airgeddon:
1sudo apt-get install airgeddon -y2Or clone from GitHub for the latest version:
1git clone https://github.com/v1s1t0r1sh3r3/airgeddon.git2cd airgeddon/3Step 2 — Launch Airgeddon
Start Airgeddon with root privileges:
1sudo airgeddon2Or if you cloned from GitHub:
1sudo bash airgeddon.sh2
Airgeddon will perform initial checks and verify that all required tools are installed (like hostapd, dnsmasq, lighttpd, dhcpd, etc.). Press Enter to continue through the checks. If any tools are missing, Airgeddon will offer to install them — type y to accept.
Step 3 — Select Your Wireless Interface
Airgeddon displays all available network interfaces. Select your external wireless adapter by typing its number:
💡 Make sure you select the external USB adapter, not your built-in Wi-Fi card.
Step 4 — Put Interface into Monitor Mode
Select option 2 from the main menu to put your wireless interface into monitor mode. This is required for capturing Wi-Fi traffic:
2. Put interface in monitor mode
Your interface will be renamed (e.g., wlan0 → wlan0mon). Airgeddon will also ask if you want to kill conflicting processes — select yes.
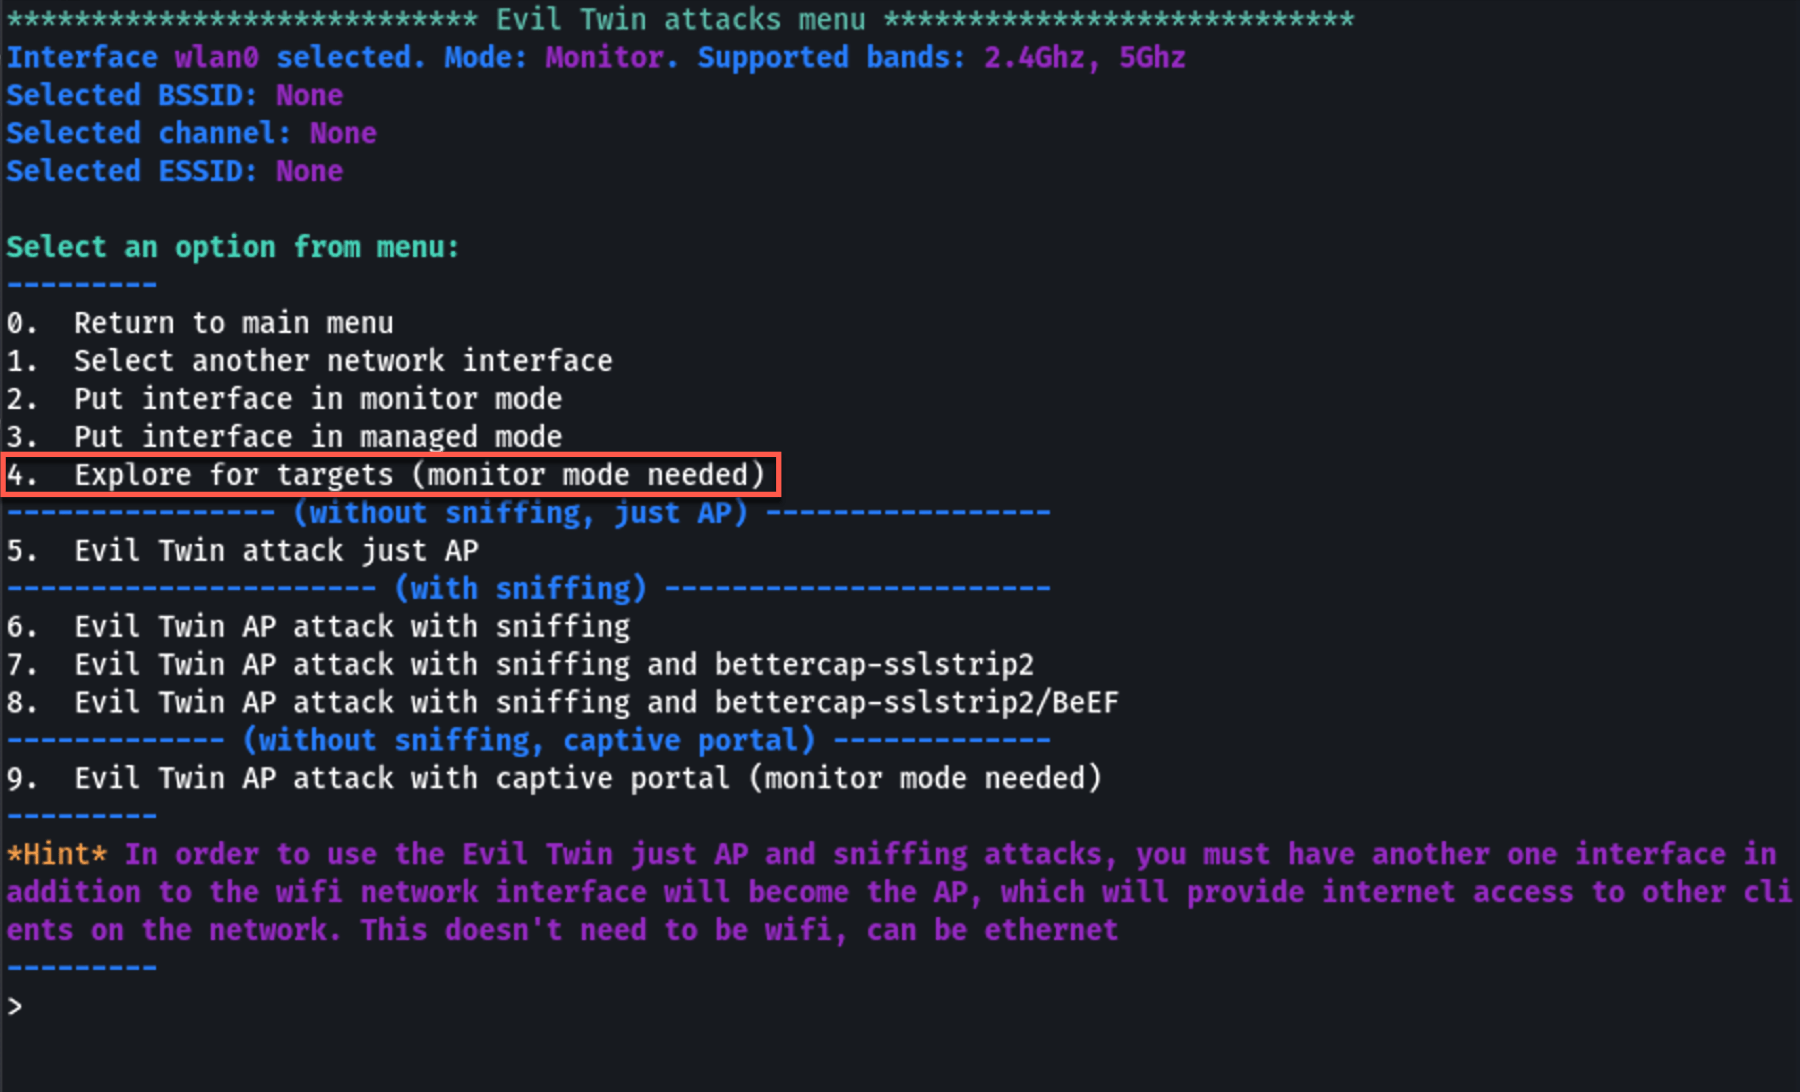
Step 5 — Select Evil Twin Attack Menu
From the main menu, select option 7 for the Evil Twin attacks menu:
7. Evil Twin AP attack menu
Then select option 9 for Evil Twin AP attack with captive portal:
9. Evil Twin AP attack with captive portal
This is the most effective variant as it creates a fake login page to capture Wi-Fi passwords.
Step 6 — Scan for Target Networks
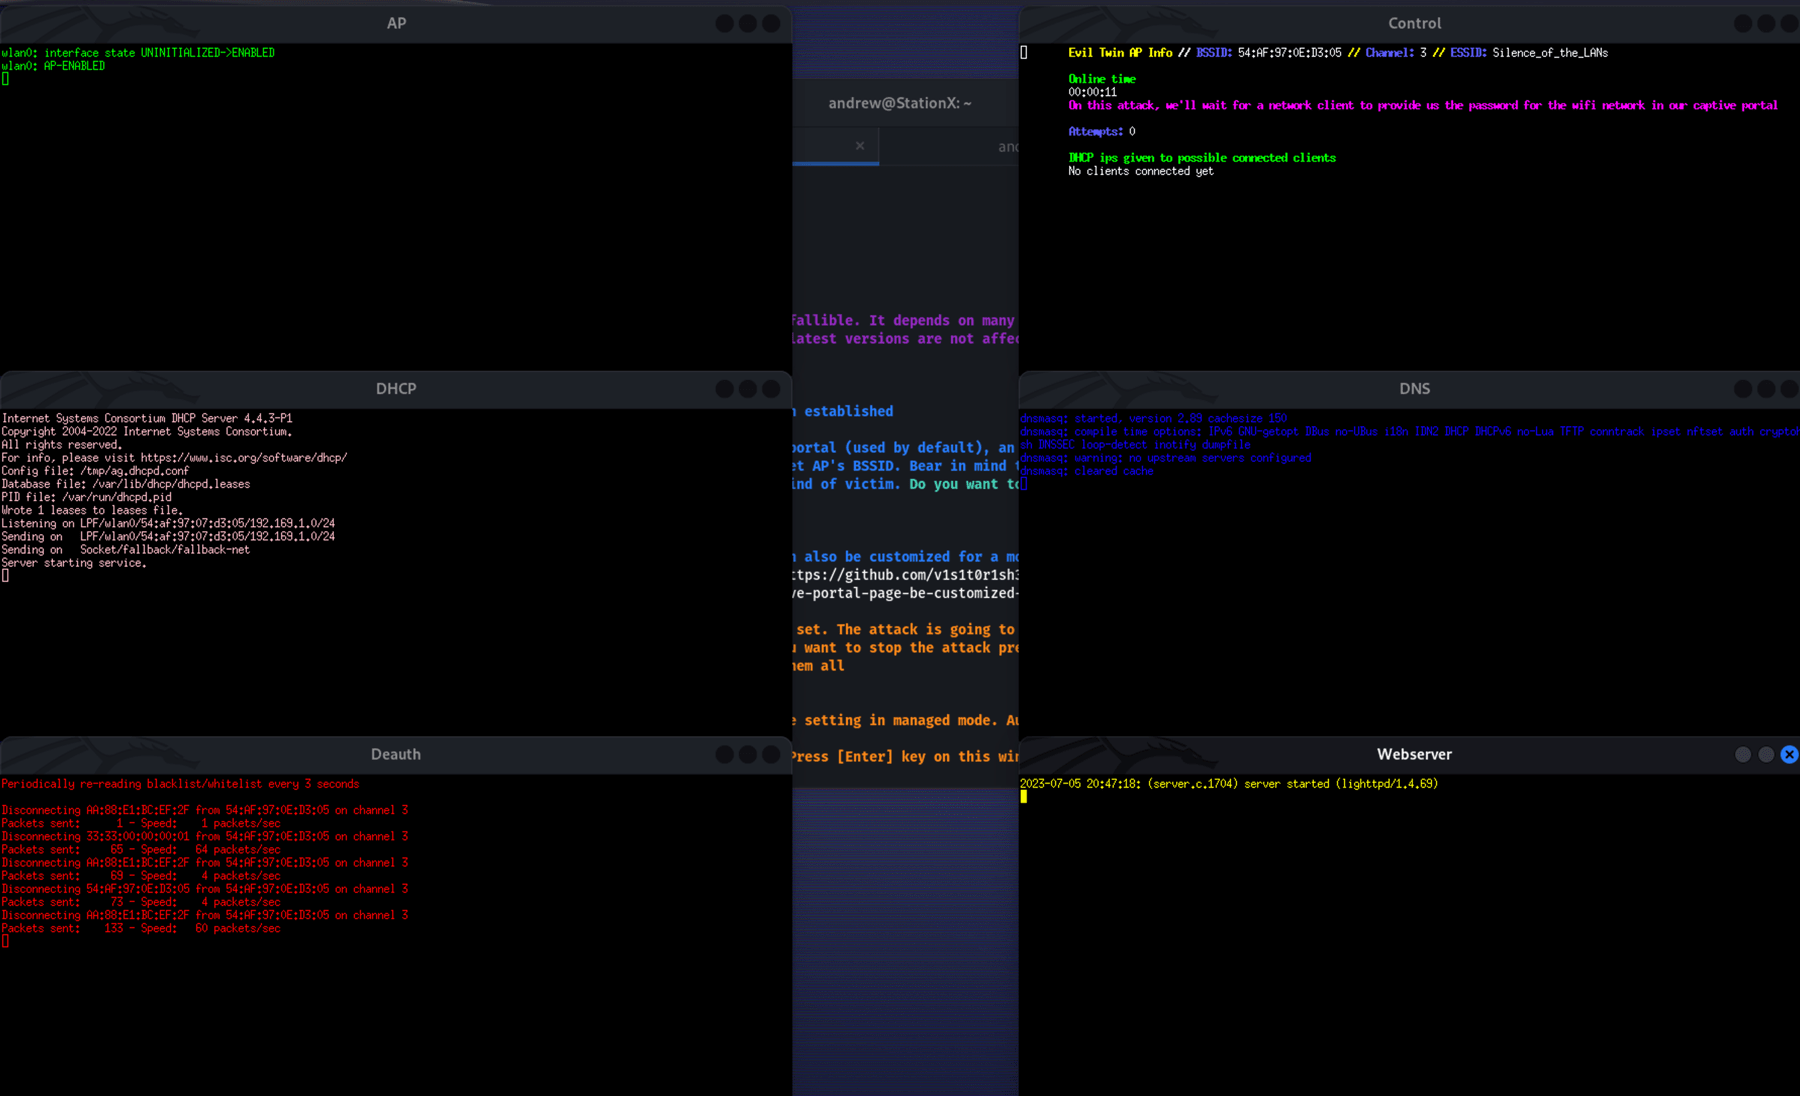
Airgeddon opens a new window and starts scanning for nearby Wi-Fi networks. Let it run for 30-60 seconds to discover all nearby networks:
Press Ctrl+C to stop the scan. You'll see a numbered list of all discovered networks:
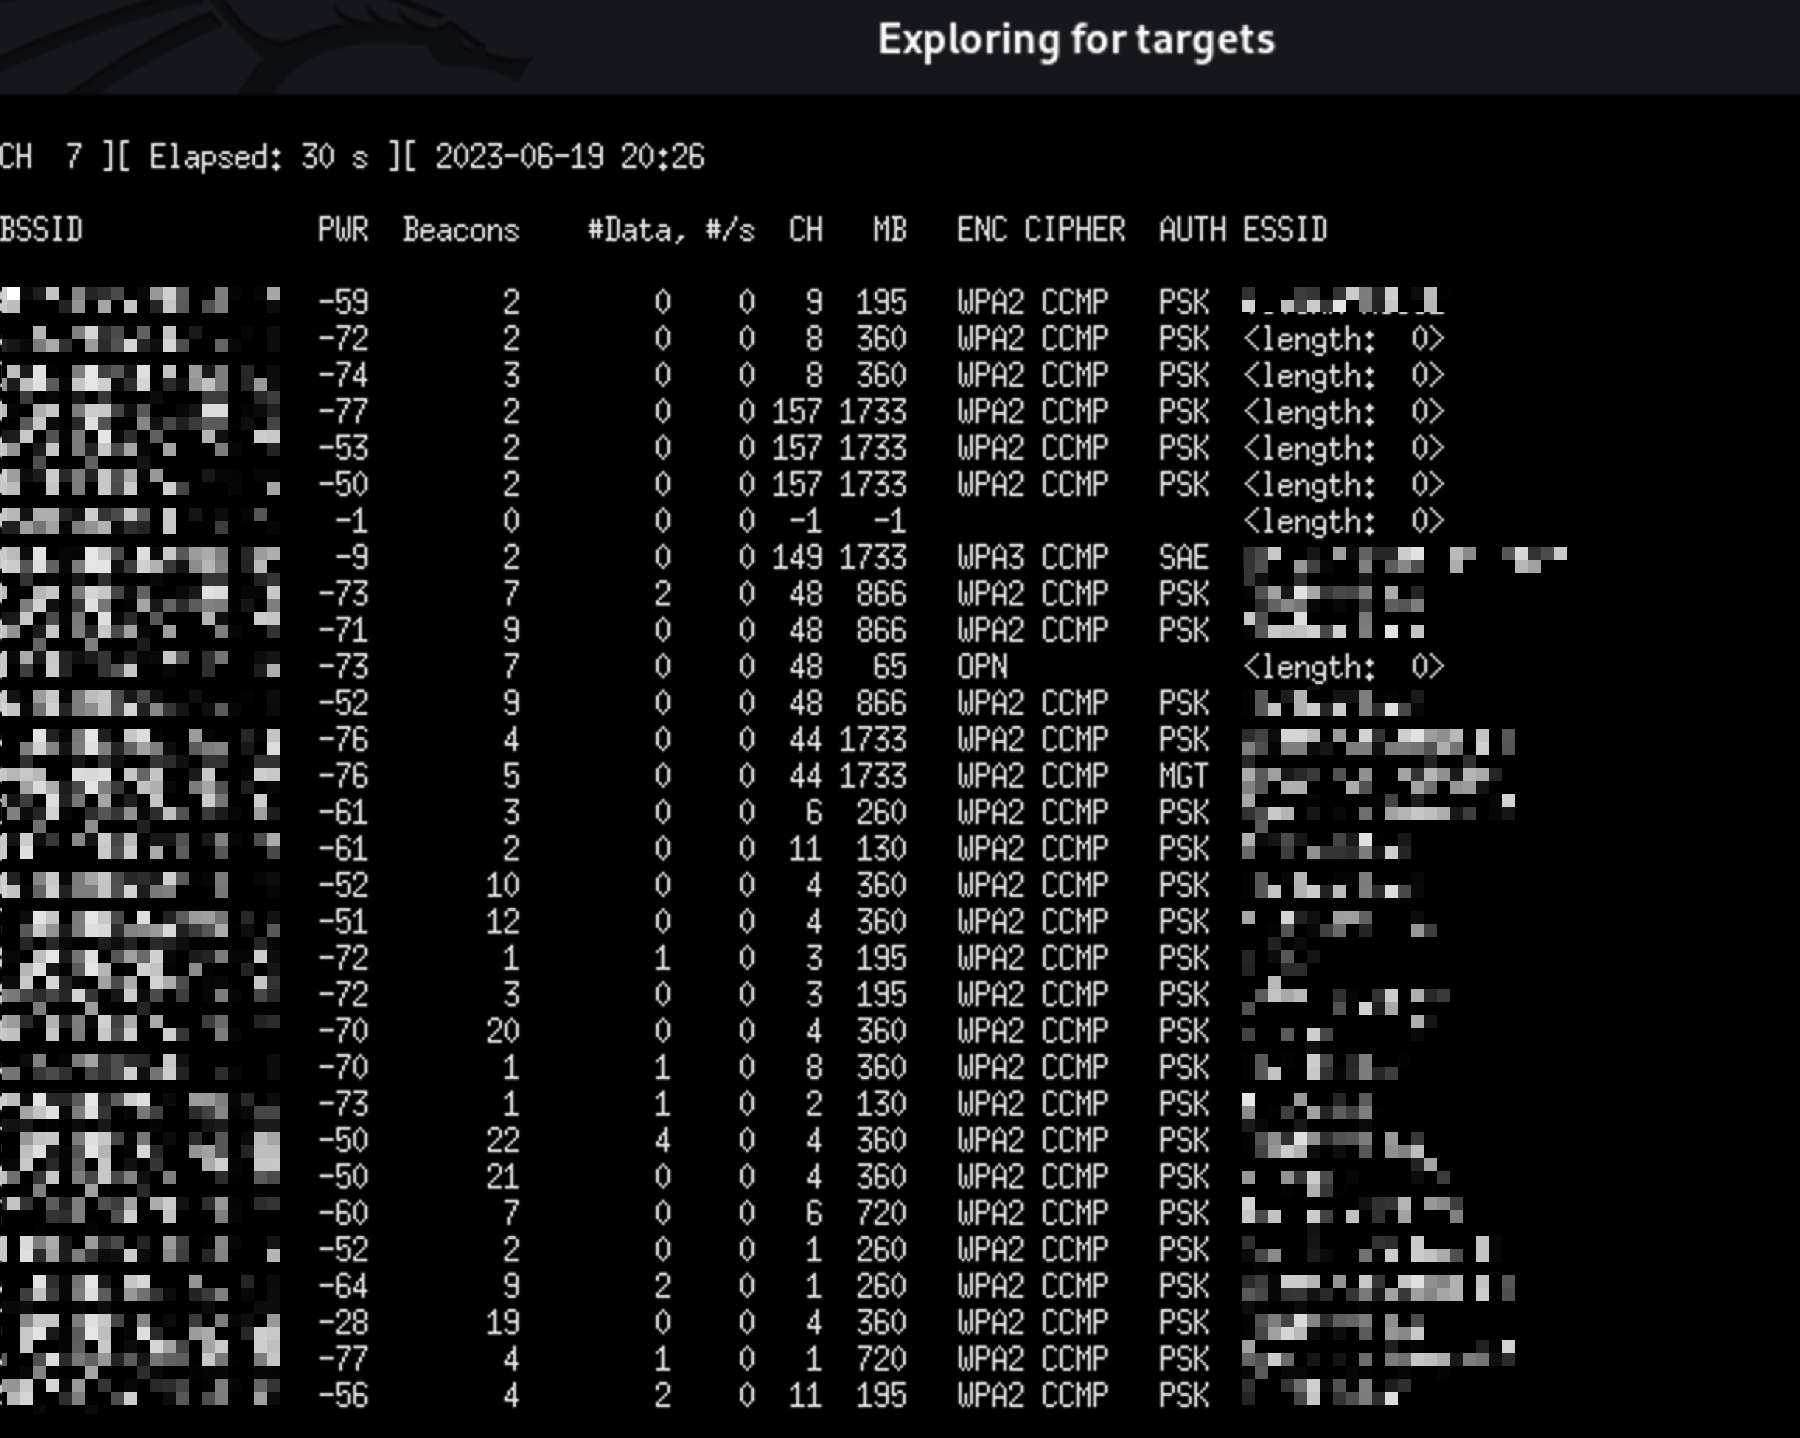
The list shows:
- BSSID — Router's MAC address
- Channel — Broadcasting channel
- Power — Signal strength
- ESSID — Network name
- Encryption — Security type (WPA2, etc.)
Step 7 — Select Your Target Network
Type the number corresponding to your target network and press Enter:
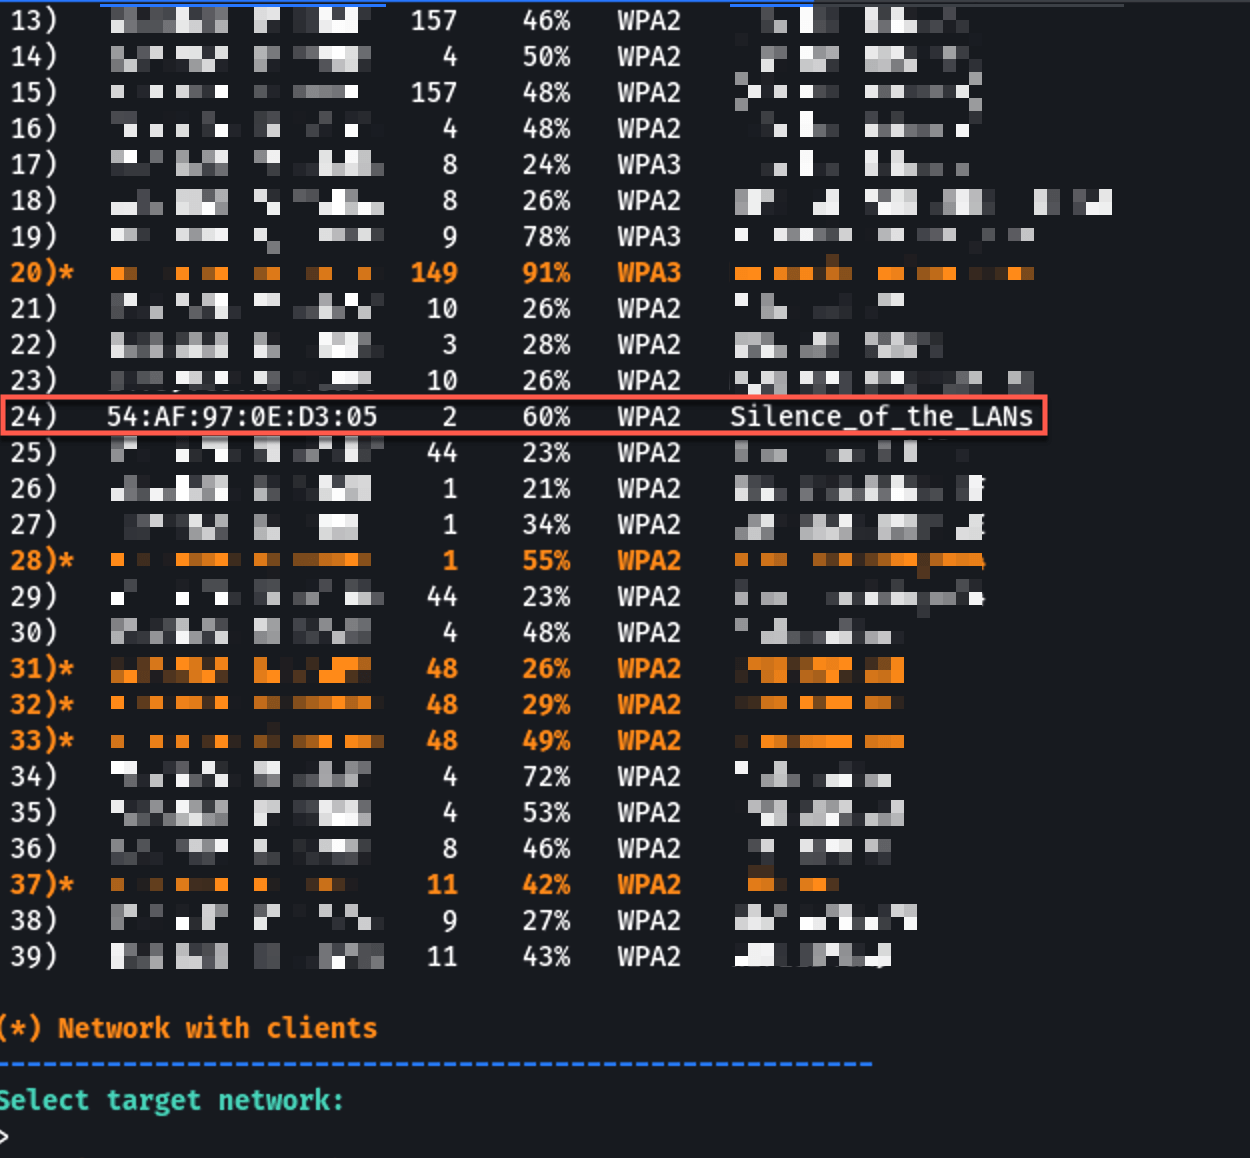
⚠️ Only select networks you own or have authorization to test!
Step 8 — Configure Deauthentication Attack
Airgeddon asks you to select a deauthentication method. The deauth attack forces all devices off the legitimate network so they reconnect to your Evil Twin:
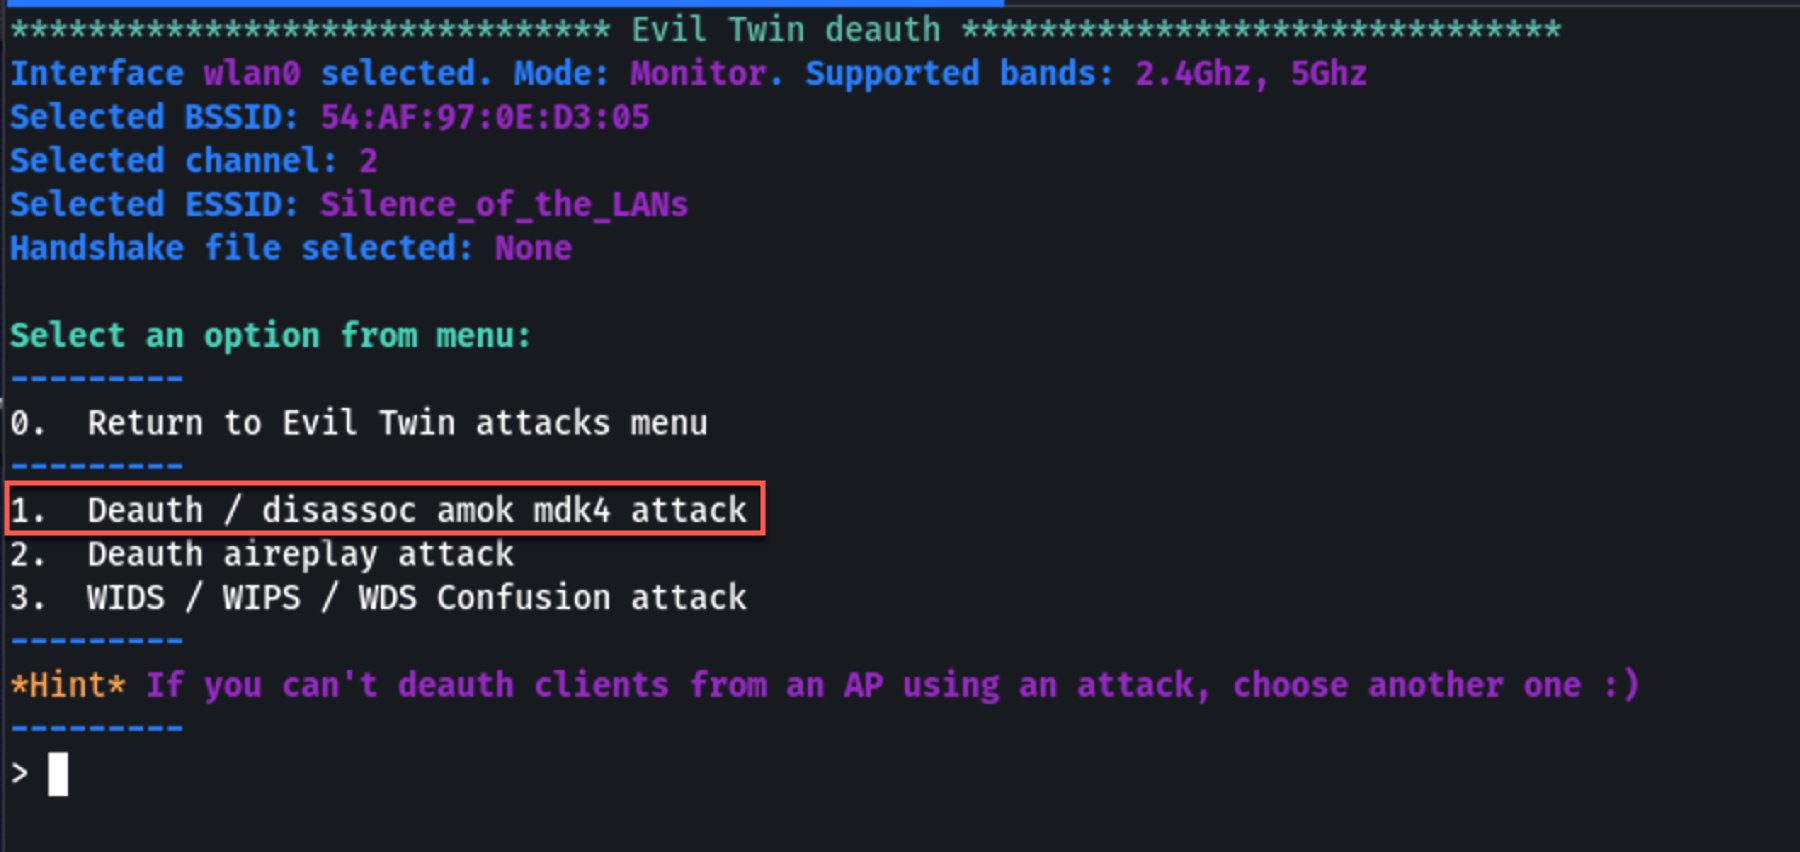
Common options:
aireplay-ngdeauth — Most reliablemdk4deauth — More aggressive
Select your preferred method and continue through the prompts:
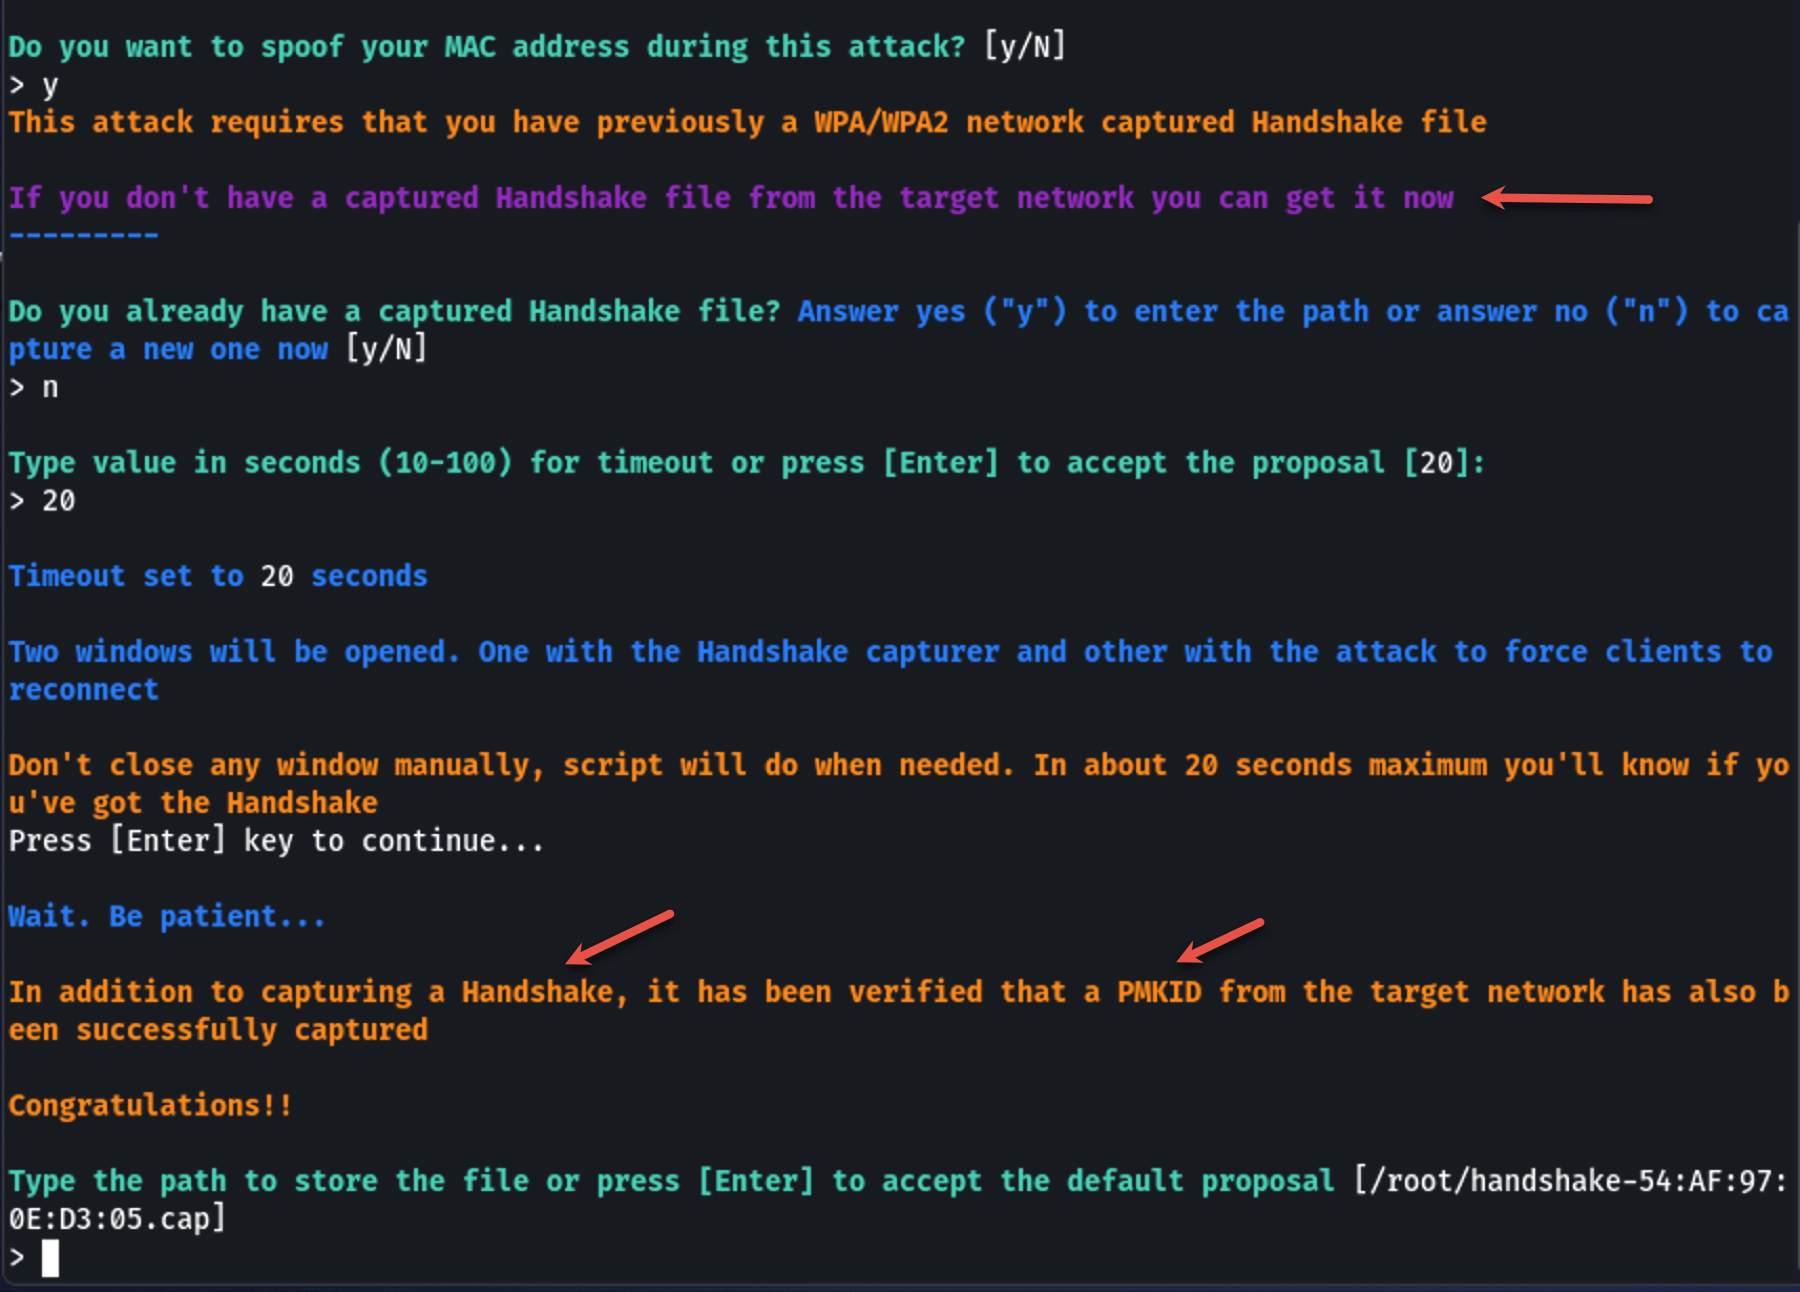
Step 9 — Capture the WPA Handshake
Airgeddon will attempt to capture a WPA handshake from the target network. This handshake is needed to verify that the password entered in the captive portal is correct.
Wait for the handshake capture — you'll see a confirmation message:
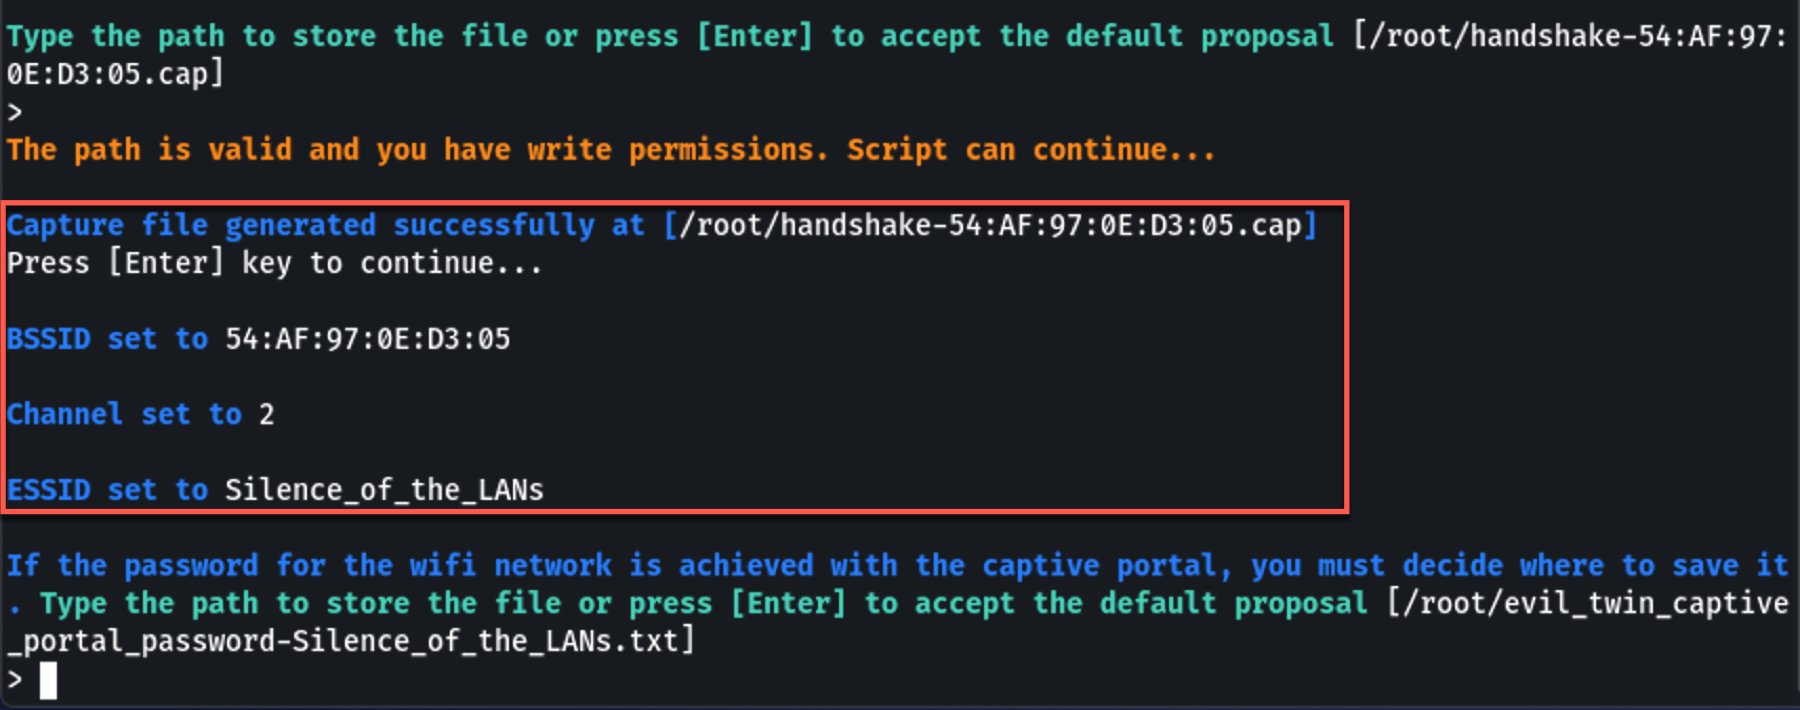
💡 If you already have a captured handshake file (.cap), Airgeddon will ask if you want to use it instead.
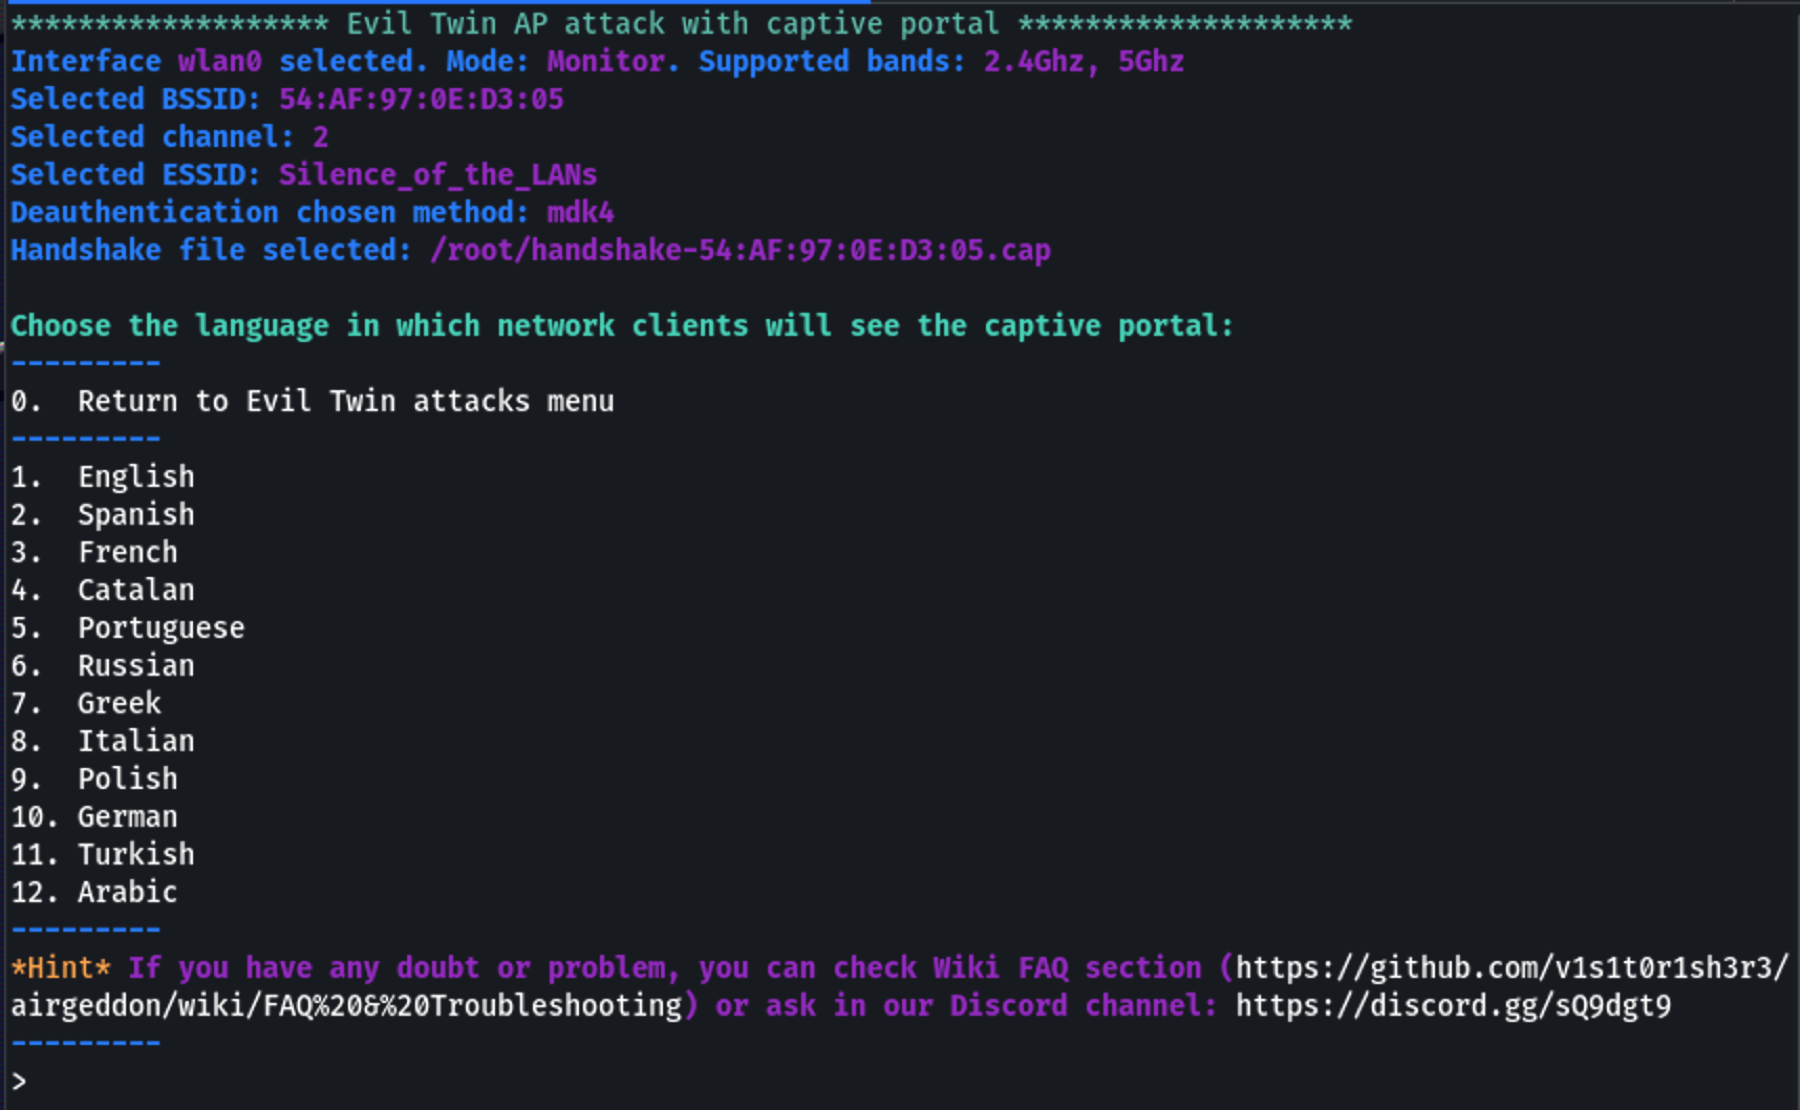
Step 10 — Configure the Captive Portal
Airgeddon sets up the captive portal. You'll be asked to:
- Select the captive portal language (English, Spanish, etc.)
- Confirm the configuration
Airgeddon will now automatically:
- Create a fake AP with the same SSID as the target
- Start hostapd to run the rogue access point
- Start dnsmasq for DHCP and DNS spoofing
- Start lighttpd to serve the captive portal page
- Begin the deauthentication attack on the real network
⚠️ DO NOT close any of the windows that pop up! They are all part of the attack.
Step 11 — The Attack in Action
When a victim's device disconnects from the real network (due to deauth) and connects to your Evil Twin, they see this captive portal page:
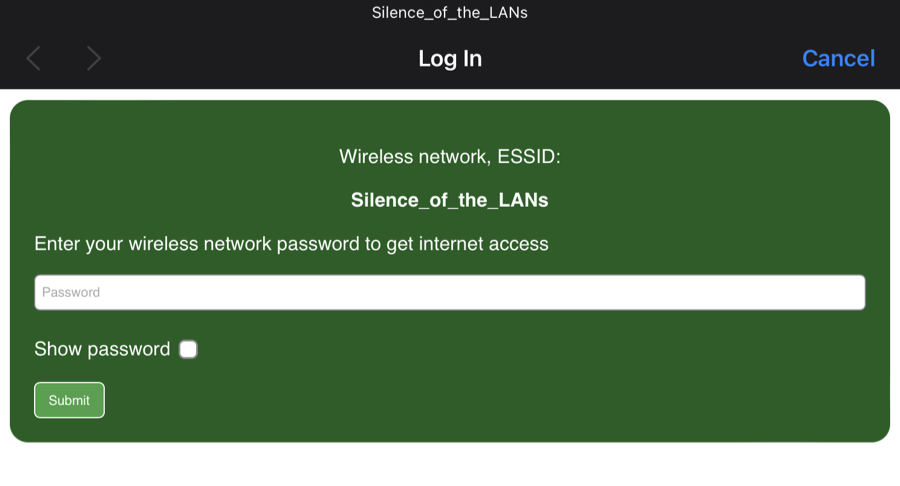
The page looks like a legitimate router login, asking the user to enter their Wi-Fi password for "reauthentication."
Step 12 — Capture the Credentials
When the victim enters their Wi-Fi password and clicks submit, Airgeddon:
- Captures the password entered in the portal
- Verifies it against the captured WPA handshake
- Displays the result in the terminal
The captured credentials are stored and displayed:
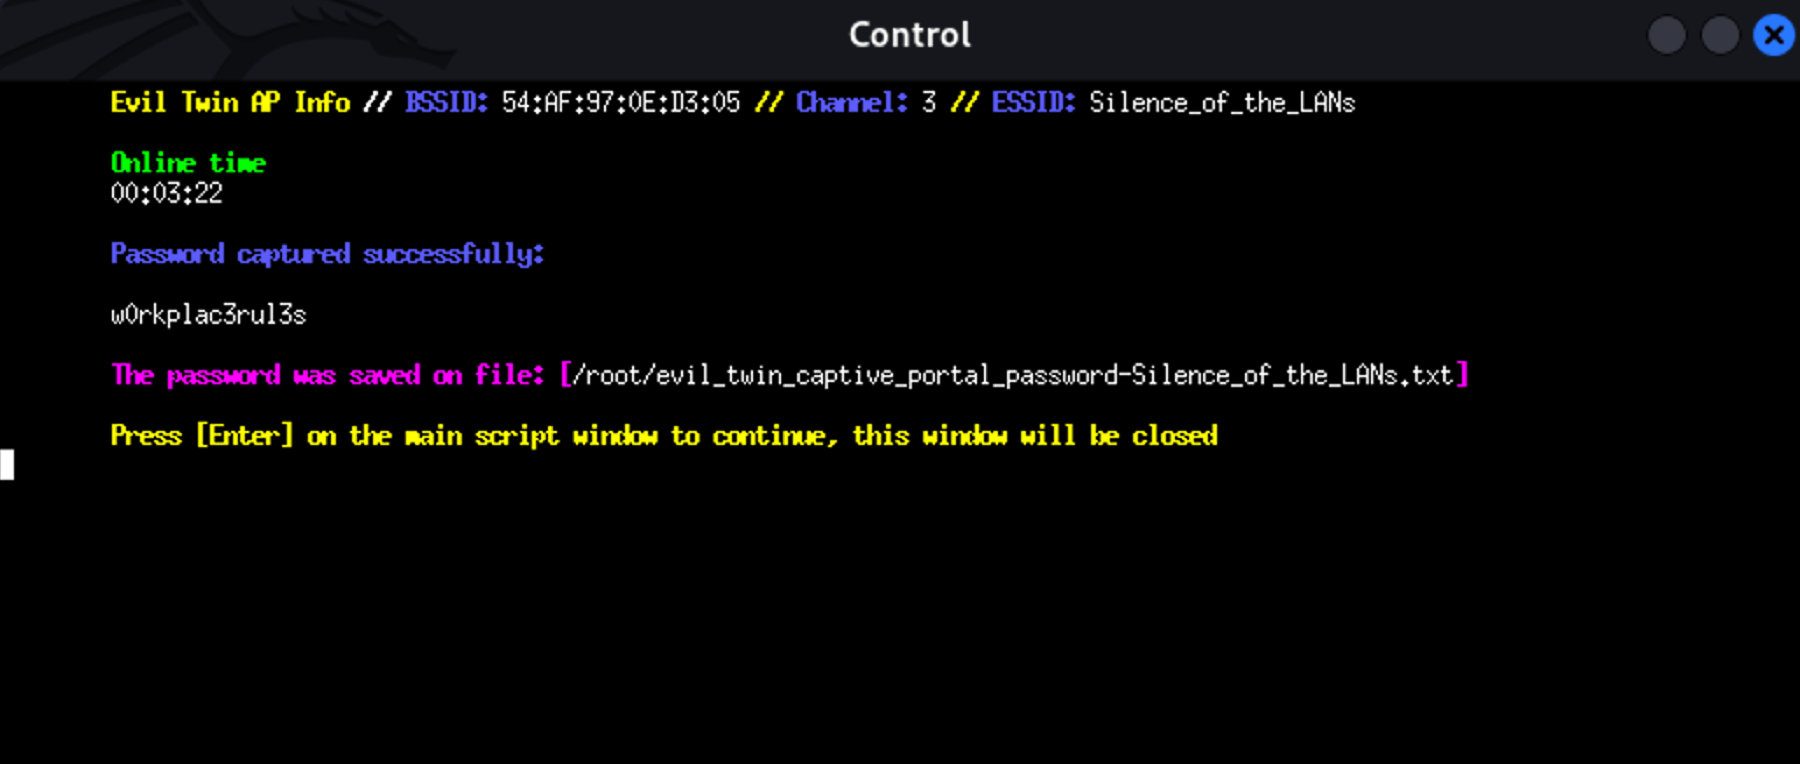
🎯 Password Captured! If the password matches the WPA handshake, Airgeddon confirms it's the correct password and stops the attack.
Step 13 — Stop the Attack and Clean Up
To stop the attack, press Enter in the main Airgeddon terminal. Then:
- Select the option to stop the Evil Twin AP
- Switch your interface back to managed mode:
1# From Airgeddon menu, or manually:2airmon-ng stop wlan0mon3- Restart your network services:
1sudo systemctl start NetworkManager2Quick Command Reference
| Step | Command / Action |
|------|-----------------|
| Update system | sudo apt update && sudo apt upgrade -y |
| Install Airgeddon | sudo apt-get install airgeddon -y |
| Launch | sudo airgeddon |
| Monitor mode | Menu option 2 |
| Evil Twin menu | Menu option 7 |
| Captive portal attack | Menu option 9 |
| Scan networks | Auto-scan, then Ctrl+C |
| Select target | Enter network number |
| Deauth method | Select aireplay-ng or mdk4 |
| Handshake capture | Automatic or use existing .cap file |
| Captive portal | Select language, portal auto-launches |
| Stop attack | Press Enter in main terminal |
| Restore network | airmon-ng stop wlan0mon + systemctl start NetworkManager |
Real-World Scenarios Where Evil Twin Attacks Happen
Evil Twin attacks are most commonly seen in:
- ☕ Coffee shops — Fake "CoffeeShop_WiFi" networks
- ✈️ Airports — Fake "Airport_Free_WiFi" access points
- 🏨 Hotels — Rogue APs mimicking hotel networks
- 📚 Libraries — Open networks are easy targets
- 🏢 Corporate buildings — Targeting employees on company Wi-Fi
The attacker simply needs to be within range of the target network and have a wireless adapter that supports monitor mode.
How to Protect Yourself from Evil Twin Attacks
- Use a VPN — Encrypts your traffic even on rogue networks
- Avoid open Wi-Fi — Don't connect to unknown or suspicious networks
- Verify network names — Ask staff for the exact SSID before connecting
- Disable auto-connect — Turn off automatic Wi-Fi connections on your devices
- Use cellular data — When in doubt, use mobile data instead of public Wi-Fi
- Enable HTTPS everywhere — Make sure websites use HTTPS before entering credentials
- Use WPA3 — If available, WPA3 provides better protection against Evil Twin attacks
- Be suspicious of captive portals — Legitimate networks don't usually ask you to re-enter your Wi-Fi password
- Monitor for duplicate SSIDs — If you see two networks with the same name, one could be fake
Watch the Full Video Tutorial:
Conclusion
Evil Twin attacks demonstrate how easily public Wi-Fi networks can be compromised. By understanding the attack methodology, you can better protect yourself and your organization from falling victim to these sophisticated social engineering techniques.
The key takeaway: never trust public Wi-Fi blindly, and always use a VPN when connecting to networks outside your control.
⚠️ Remember: This guide is for educational purposes only. Always obtain proper authorization before testing any network security.
Happy Ethical Hacking! 🚀
About the Author

Akki (Akshay)
"Learning should be a continuous journey."
Akki is a passionate ethical hacker and tech enthusiast. He created this blog to share experiences, tips, and tutorials on various hacking tools and technologies, helping others navigate their path to mastering the cybersecurity world.